
(Disclaimer: This post contains affiliate links. If you purchase through these links, Homeoration earns a small commission at no extra cost to you—it helps keep this content free.)
Every living room has a TV problem.
The television is the largest object on the wall, the most visually dominant element in the room, and the one thing that most interior design philosophies have no elegant answer for. Japandi—a philosophy built on calm, natural materials, and intentional composition—is particularly uncomfortable with the black rectangle that dominates most living rooms.
The slatted wood TV wall is the answer that 2026 has arrived at. It works not by hiding the television—though it does make a turned-off screen significantly less obtrusive—but by giving the wall itself enough material presence and architectural warmth that the TV becomes one element within a considered composition rather than the unavoidable focal point of an otherwise empty wall.
It is also, as it happens, one of the most achievable and highest-impact design upgrades available to a US homeowner in 2026.
Whether you rent or own, whether you have a $200 budget or a $2,000 one, there is a slatted wood TV wall approach that works for your specific situation. This guide covers all three—the prefab panel approach, the DIY build approach, and the full renovation approach—along with the specific products, dimensions, and styling decisions that make the difference between a wall that looks like a project and one that looks like it was always there.
Table of Contents
Why Slatted Wood Works in a Japandi Room
Before the how, the why—because understanding what the slatted wall is doing architecturally makes every subsequent decision easier.
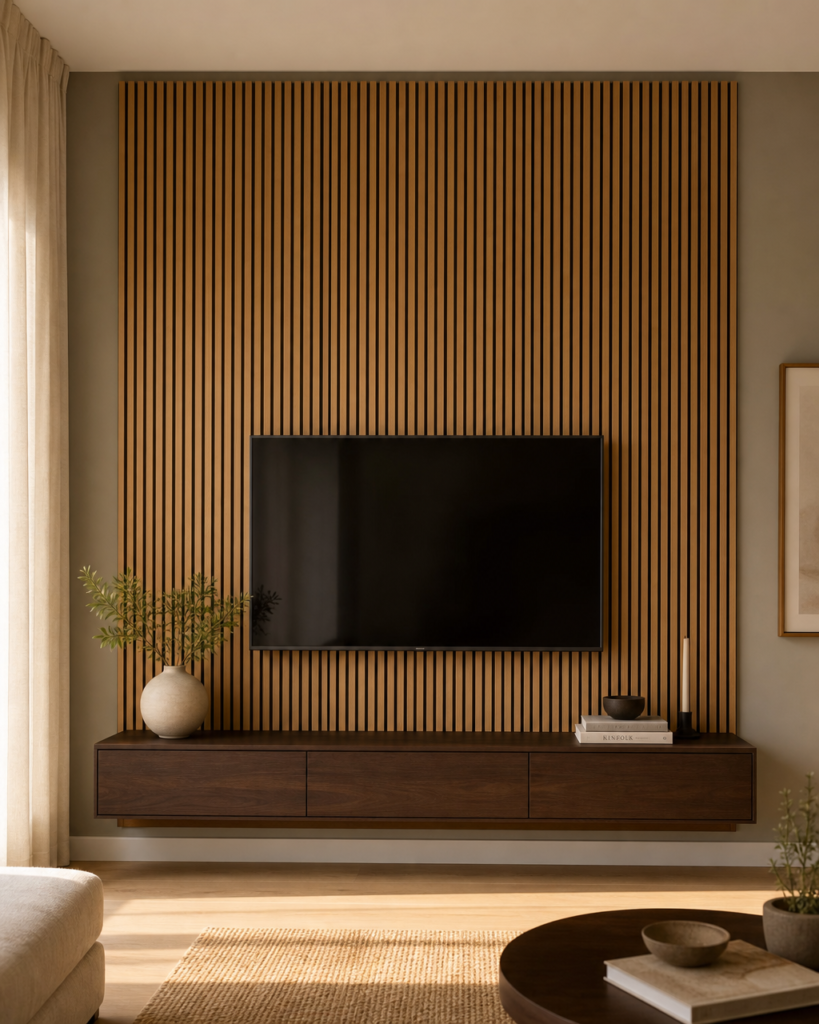
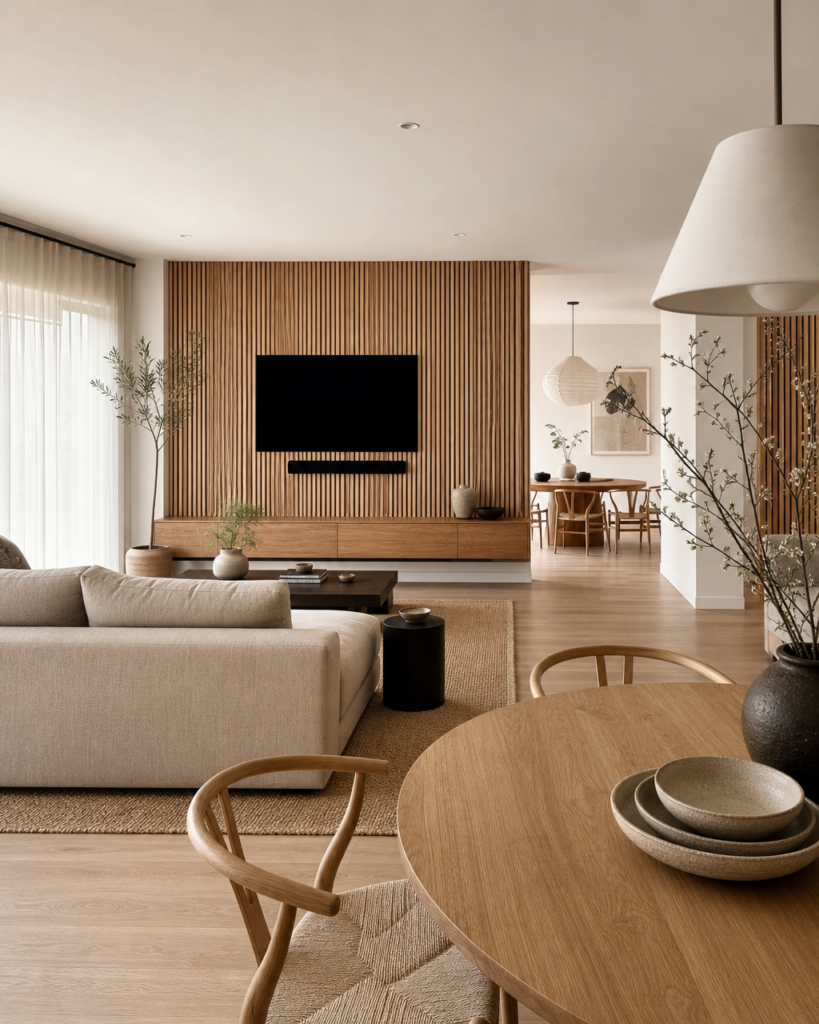
It adds texture without pattern. The fundamental tension in a Japandi living room is between the need for visual interest and the prohibition on decoration for its own sake. Slatted wood resolves this perfectly. The vertical lines create visual rhythm and depth without introducing any color, pattern, or object that competes with the room’s palette. The shadow lines between the slats change as the light moves through the day, meaning the wall is never the same twice without ever being busy.
It warms the technology. A television mounted on a flat painted wall reads as technology intruding on a domestic space. The same television mounted on warm oak or walnut slats reads as technology integrated into a natural material environment. The wood surrounds the screen and contextualizes it—not eliminating its presence, but giving it a frame that belongs to the room’s material language.
It handles the cable problem. The slatted structure—particularly when built with a cavity behind the slats—provides a natural channel for running cables, power strips, and media equipment cables entirely out of sight. A slatted TV wall done correctly produces a wall that appears completely cordless from any seated position in the room.
Acoustic benefit. This is the 2026 addition that most guides miss. Natural wood slats and acoustic panel systems with felt backing reduce echo and ambient noise in living rooms—particularly relevant in open-plan spaces with hard floors and minimal soft furnishings. A living room that sounds quieter actually feels calmer, which is central to the Japandi proposition.
Three Approaches: Choose Based on Your Situation
Approach 1: Prefab Acoustic Slat Panels (Renters and Budget-Conscious Owners)
This is the fastest, most reversible, and increasingly most polished approach. Acoustic slat panels come in standard sizes—typically 94×23 inches or 96×24 inches—with a felt or acoustic foam backing that allows them to be mounted with adhesive strips, picture rail hooks, or minimal screws depending on the product and wall type.
The quality of prefab panels has improved dramatically in 2026. The best options now use real wood veneer over MDF—solid enough to look genuinely architectural from any normal viewing distance, light enough to mount without structural wall anchors.
What to look for:
- Real wood veneer surface—oak, walnut, or ash. Avoid PVC or plastic slat products that appear in lower-price searches.
- Acoustic felt backing in black or charcoal—this is what absorbs sound and what conceals the wall surface behind the panels.
- Slat width of 10–15mm—this is the authentic Japandi proportion. Wider slats read as rustic rather than minimal.
- Gap width of 3–5mm between slats—enough to create shadow line depth without the gaps being the dominant visual element.
Approach 2: DIY Slat Build (Homeowners Who Want the Most Authentic Result)
The DIY approach produces the most genuinely architectural result—a wall that looks custom-built because it is. It requires more time and intermediate woodworking skill but produces a wall that cannot be distinguished from a professional renovation at any distance.
The basic structure: A DIY Japandi slat wall consists of three components: a substrate (typically 3/4 inch plywood or MDF sheets painted matte black), the slats themselves (typically 1×2 or 1×3 solid wood in your chosen species), and the mounting system (construction adhesive plus finish nails or a nail gun).
The substrate is what makes DIY look professional. The black-painted background behind the slats—visible in the gaps—is what creates the shadow depth that makes the wall look three-dimensional. Without a substrate, the wall color behind the slats reads through the gaps and flattens the entire effect. Always install a full black substrate before attaching slats.
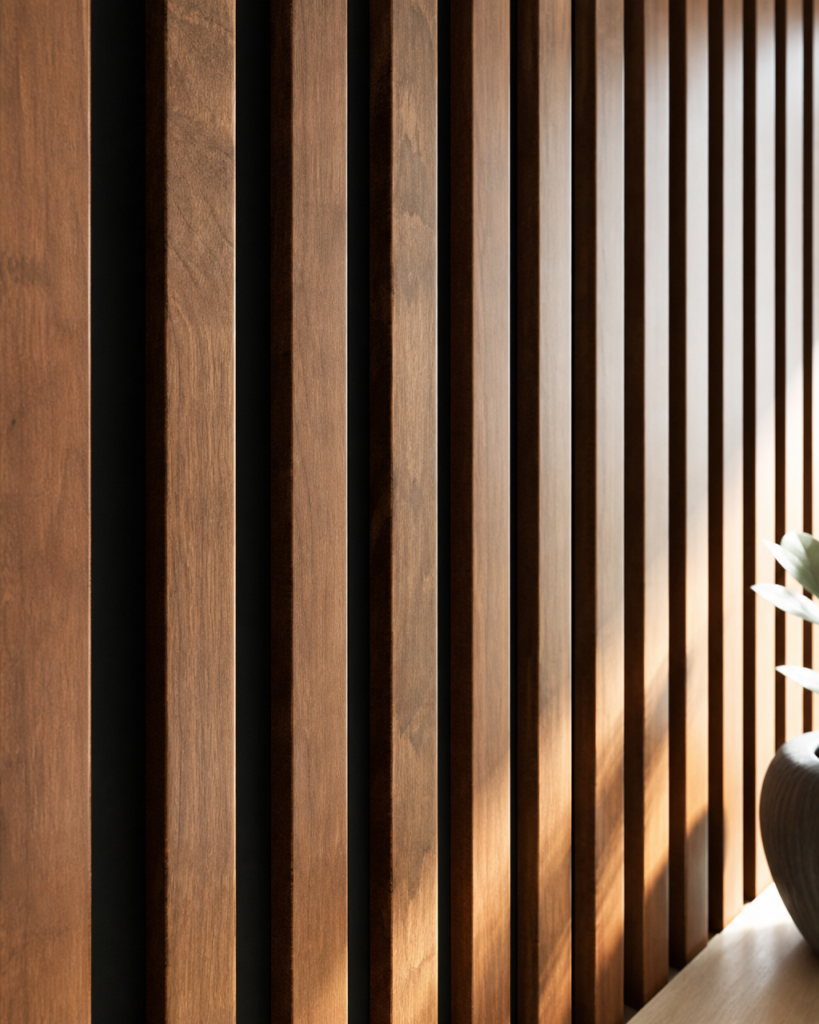
Species and dimension guide: For a warm, light Japandi result—white oak or ash 1×2 boards with 1/4 inch gaps. The lighter wood against the black substrate produces maximum contrast and depth. For a warmer, richer Japandi result—walnut or stained poplar 1×2 boards with 3/8 inch gaps. The deeper wood produces a moodier, more Japanese effect.
Installation sequence for DIY: Cut your plywood substrate to the wall dimension—floor to ceiling, full TV wall width. Paint it matte black on the face that will be visible. Mount it to the wall using appropriate anchors for your wall type. Then cut all slats to the same length.
Starting from the center of the wall, work outward applying construction adhesive to the back of each slat and using a spacer—a piece of scrap wood cut to your chosen gap width—to maintain consistent spacing. Finish nails through the face of each slat into the substrate hold everything while the adhesive cures. Fill nail holes with wood filler matching your stain color. Sand flush when dry. One final coat of matte clear sealer and the wall is complete.
The cable management advantage of DIY: Before mounting the substrate, run your TV power cable and any HDMI or media cables through the wall using an in-wall cable management kit. This produces a genuinely cordless finished result.
Approach 3: Full Renovation Media Wall (Homeowners with Larger Budgets)
The full renovation approach builds a floor-to-ceiling media wall with integrated storage, concealed equipment, and a fully custom slat structure. This is the approach shown in the Architectural Digest and design publication versions of the Japandi TV wall—the one that looks like it was always part of the architecture.
This approach requires a contractor for the structural and electrical work but produces a result that is genuinely architectural—a wall that adds real resale value and transforms the room’s entire character.
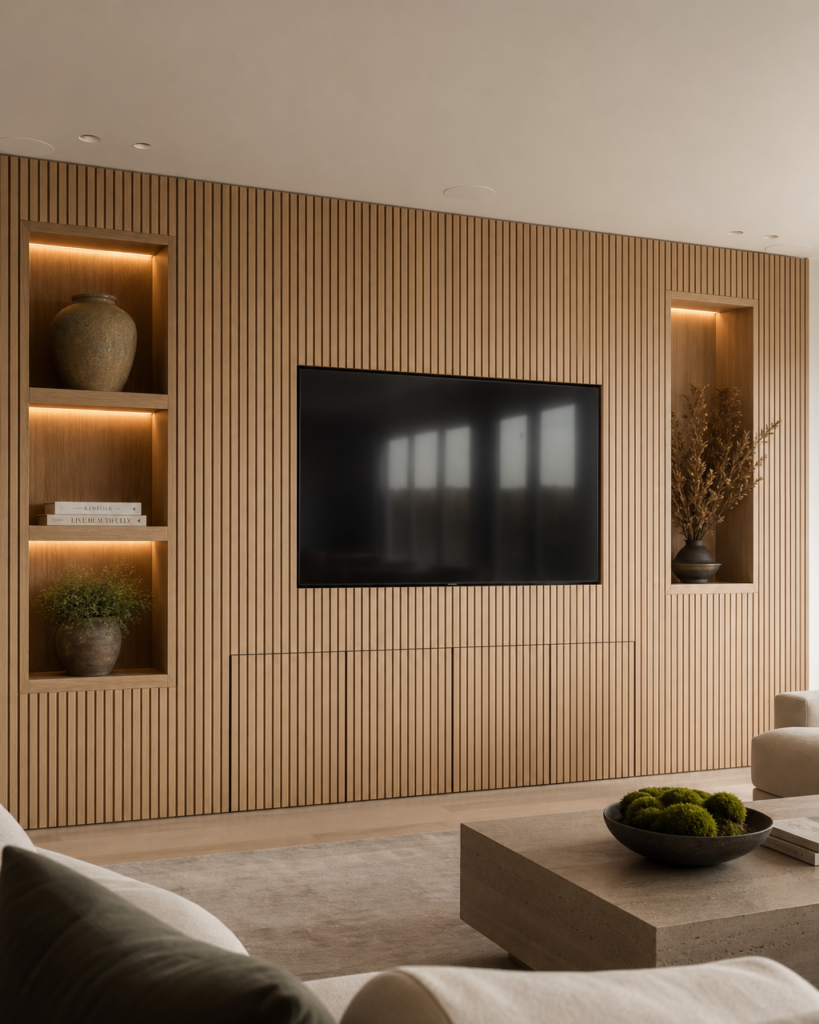
Key elements of the full renovation media wall:
- Floor-to-ceiling slatted wood structure across the full wall width—typically 10–16 feet.
- Integrated open shelving sections flanking the TV—for equipment, objects, and plants.
- Concealed equipment cabinet below the TV—houses streaming devices, game consoles, and power strips completely out of sight.
- In-wall power outlet and data ports behind the TV mounting position—completely eliminates surface-mounted cables.
- Acoustic felt panel backing across the full wall for sound management.
Budget range: $2,500–8,000 depending on wood species, wall size, cabinetry complexity, and local contractor rates. White oak is the most expensive species for this application—walnut-stained poplar or pine produces a visually identical result at 40–60% lower material cost.
Styling the Japandi Slatted TV Wall
The wall itself is the architectural decision. The styling within and around it determines whether the room reads as Japandi or simply as a room with a wood wall.
The TV position: Center the television on the slat wall at the correct viewing height—center of screen at seated eye level, approximately 42–48 inches from the floor for a standard sofa seating position. Many people mount TVs too high. The default position of hanging a TV where a painting would go is always too high for comfortable viewing and forces the head upward which is both physically uncomfortable and compositionally wrong.
The console: A low-profile Japandi TV console sits beneath the slatted wall and grounds the composition. It should be no taller than 18 inches—the low height is central to the Japandi aesthetic of furniture that does not compete with sightlines.
The objects: A slatted TV wall with nothing on it looks like a feature wall waiting to be finished. A slatted TV wall with three carefully chosen objects looks like a room. The rule is the same as every Japandi surface—three items, chosen for material quality and silence.
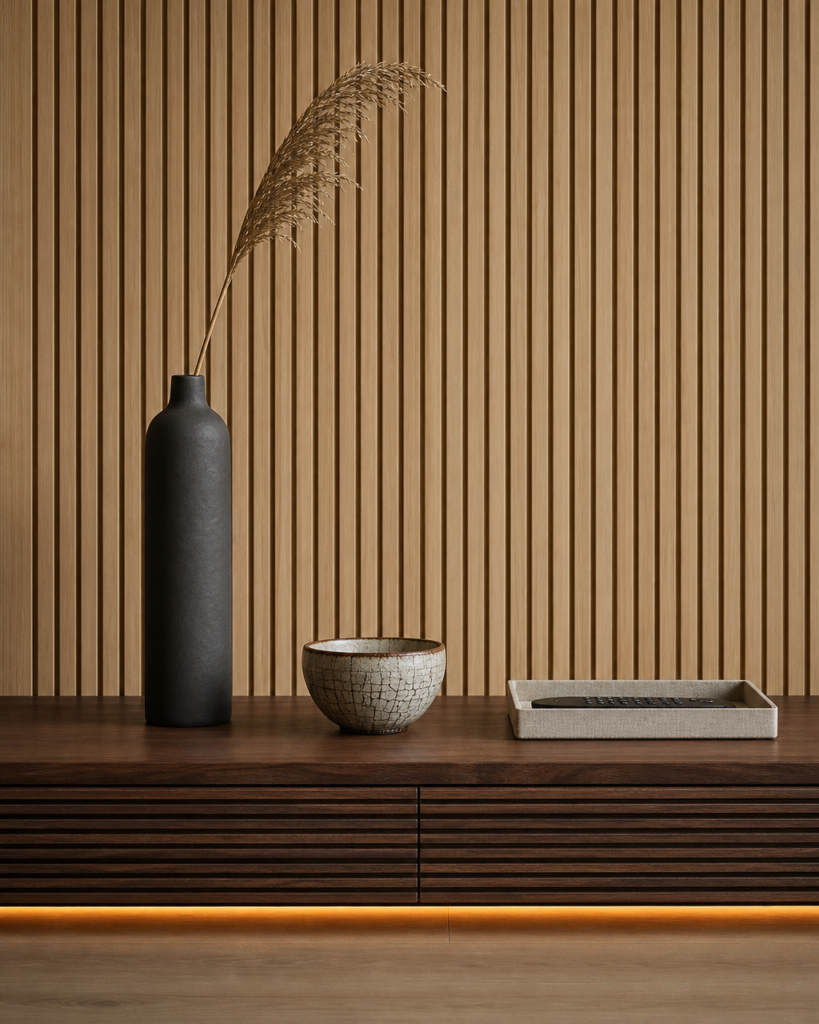
On the console: one ceramic vessel (a tall matte charcoal vase holding a dried stem), one small ceramic object (a raku bowl, a smooth stone), and the TV remote in a small tray—hidden, contained, resolved. On the wall if open shelving exists: books spine-out in a single tonal family, one small plant, one object per shelf maximum.
The lighting: The slatted TV wall should be lit from below or from the side—never by the overhead room light which creates flat, uniform illumination that destroys the shadow depth the slats create. Two options work well:
- Under-console LED strip lighting in warm white 2700K—hidden beneath the console surface, invisible from any seated position, creates a warm glow that separates the console from the floor and adds depth to the wall above.
- A single arc floor lamp positioned to the left or right of the wall at standing height, pointed toward the wall rather than the seating. The directional light creates the shadow lines in the slats that make the wall three-dimensional.
Room-Specific Considerations
Small living rooms
Use lighter wood slats—white oak or natural pine—and limit the slat wall to the TV wall only. Extending slats to adjacent walls in a small room makes the space feel enclosed. The contrast between the slatted feature wall and smooth painted walls on the other three sides creates depth without reducing the perceived size of the room.
Open-plan living and dining rooms
The slatted wall functions as a room anchor—it tells the open plan where the living zone begins. This is particularly effective in Japandi open-plan spaces where the challenge is creating distinct zones without physical walls. A floor-to-ceiling slatted wall behind the TV visually separates the living zone from the dining zone with material presence rather than a physical barrier.
Apartments and rentals
Use prefab acoustic panels with Command Heavy Duty strips or black drywall screws. For maximum coverage without drilling, combine two 94-inch panels vertically to achieve a near-floor-to-ceiling look on standard 8-foot apartment ceilings.
Rooms with fireplaces
If the fireplace and TV share the same wall—one of the most common US living room configurations—the slatted wall running behind both creates the unifying architectural element that makes the dual focal point feel resolved rather than competing. The slats behind the fireplace surround reference natural wood and warmth; the slats behind the TV reference the same material language. The wall becomes one composed feature rather than two competing ones.
Frequently Asked Questions
Can I install a slatted wood TV wall in a rental apartment?
Yes—using prefab acoustic slat panels, provided you use the right mounting hardware. Mount panels using Command Heavy Duty Picture Hanging Strips or by driving black drywall screws directly through the black felt backing. Do not use double-sided construction tape (like VHB), as it will violently tear the drywall paper off your walls when you move out. Two 94×23 inch panels cover the TV wall of a standard apartment living room. Search “BUBOS acoustic wood slat panels” on Amazon for the most widely reviewed rental-friendly option.
How much does a Japandi slatted wood TV wall cost?
The three approaches have very different cost profiles. Prefab acoustic panels: $270–520 in materials for a standard TV wall. DIY slat build: $150–400 in materials depending on wood species. Full renovation media wall: $2,500–8,000 including contractor labor. All three approaches produce a result that transforms the room—the difference is primarily in the degree of architectural integration and the permanence of the installation.
What wood species looks most Japandi for a TV wall?
White oak is the most authentically Japandi choice—its warm grain and light tone reference both Japanese minimalism and Scandinavian design simultaneously. Walnut produces a moodier, darker result that is particularly effective in the “dark Japandi” style gaining popularity in 2026. Poplar stained with Minwax Special Walnut is the most cost-effective approach—visually indistinguishable from solid walnut at normal viewing distances and significantly cheaper than either solid species.
The Finished Wall
The slatted wood TV wall does something that very few design solutions manage—it solves a problem that most people had accepted as unsolvable.
The television is not going away. The living room is not becoming a screen-free sanctuary. The black rectangle is staying. The question was always how to give it a context that belongs to the room rather than dominating it—and the answer, it turns out, is to surround it with the warmest, most architectural material in the Japandi toolkit and let the wood do what wood has always done.
It absorbs light. It creates depth. It makes whatever is beside it look like it belongs there.
Start with the prefab panels if you rent. Start with poplar and Minwax if you own and want the project. Either way—start with the substrate painted matte black, and everything else follows from there.
Shop This Look
All products available on Amazon US with Prime shipping.
- Acoustic slat panels — BUBOS Acoustic Wood Slat Wall Panels in Natural Oak · ~$45–65 per panel · Search “BUBOS acoustic wood slat panels oak.” Real oak veneer, black felt backing, rental-safe installation. The fastest route to a Japandi slat wall.
- Mounting tape — Command Heavy Duty Picture Hanging Strips · ~$18–22 · Damage-free installation for prefab panels on drywall.
- DIY slat wood — Poplar Hardwood Boards 1×2×8 foot · ~$60–85 for 10 boards · Search “poplar hardwood board 1×2.” Accepts stain beautifully, significantly cheaper than solid oak or walnut.
- DIY stain — Minwax Wood Finish in Special Walnut · ~$12–16 per quart · Search “Minwax Special Walnut stain.” The most widely used Japandi wood stain. Applied to poplar it reads as authentic walnut.
- Substrate paint — Rust-Oleum Matte Black Spray Paint · ~$6–8 per can · Search “Rust-Oleum matte black spray paint.” For the substrate behind the slats—the black background creates the shadow depth.
- Wood glue — Gorilla Wood Glue · ~$8–12 per bottle · Search “Gorilla Wood Glue.” For bonding slats to the substrate.
- Cable management — Datacomm In-Wall Cable Management Kit · ~$35–55 · Search “Datacomm in wall cable management kit.” Eliminates all visible cables behind the TV. The most important purchase for any TV wall installation.
- TV console — Walker Edison Low Profile TV Stand in Dark Walnut · ~$180–260 · Search “Walker Edison low profile TV stand dark walnut.” Slatted door fronts, low 14-inch height, Japandi proportions.
- Console lighting — Govee LED Strip Lights in Warm White 2700K · ~$22–35 · Search “Govee LED strip lights warm white.” Under-console glow that reveals the slat depth at night.
- Arc floor lamp — Brightech Sparq Arc Floor Lamp in Matte Black · ~$85–120 · Search “Brightech arc floor lamp matte black.” Directional lighting that creates the shadow lines in the slats.
- Ceramic vase — Matte Ceramic Vase in Dark Grey, tall · ~$25–45 · Search “matte ceramic vase dark grey tall.” One on the console with a single dried stem—the complete Japandi TV wall accent.
- Dried stems — Mkono Dried Pampas Grass Stems · ~$18–28 · Search “Mkono dried pampas stems natural.” One stem in the ceramic vase. No water, no maintenance, beautiful impermanence.